
EQUIPMENT AND TECHNIQUE
Having dealt with the factors relevant to processing both reversal and negative movie film, we are now able to consider in a little more detail the actual steps involved should the amateur wish to carry out this work for himself.
First and foremost, comes suitable equipment. Short lengths of film can be handled, it is true, in dishes or jugs, but it is generally impracticable to use these for full-sized rolls of movie film. Movie film is, after all, an expensive item in the amateur film worker's budget, and it would be foolish indeed to risk spoiling a roll merely for the sake of saving a few shillings in processing charges.
Types of Equipment
The amateur craftsman will have no great difficulty in making a simple frame for holding the film during treatment in the various solutions, and such items of equipment have been described from time to time in the photographic literature. For those who prefer to buy their equipment ready made, however, there are small, stainless steel or plastic frames and drums to take all reasonable lengths of film. The method of using these frames and drums is perfectly straightforward, although, naturally, if a commercial article is to be considered, then the instructions issued by the makers should be carefully followed.
In the limited space available in this book, it is obviously impossible to do more than outline the general routine that the amateur worker may be expected to follow in processing his own movie films. The suggestion that follow must be interpreted in this light and due allowance made where the conditions of working are not the same. Furthermore, the choice of processing solutions must depend on the type of film to be processed, and here again it would be wise to abide by the manufacturers' recommendations.
| Film Processing Equipment | |
|
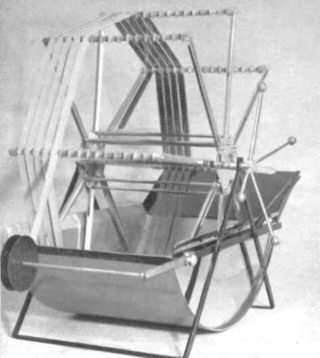
Operating a skeleton type processing drum. The photograph is from K L Briggs Ltd |
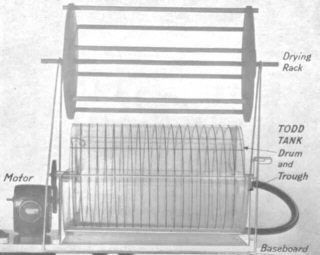
| Skeleton type drum processing machine for 16mm film. This model holds up to 100 feet, or 30m of film. The processing trough hold 60 oz. or 1700 cc of solution. construction is of nickel plated brass to resist chemical attack A loading bar, seen attached to the ront of the machine, is provided to hold the spool during threading of the film on to the drum. The drum was made by K L Briggs Precision Equipment Ltd. from Hove in Sussex. | |
|
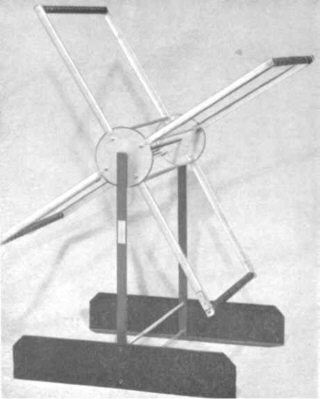
A frame type drier for up to 100 feet (30m) of 16mmm film. A special device is provided to allow for shrinkage of the film during drying. |
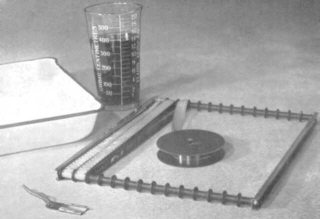
| A simple frame show right and below. The flat shape allows it to be processed in a flat dish requiring from 15 to 20 oz of solution only. Two models were available, one to take up to 25 feet, 7.5m of 16mm film in a 12in x 10in (300mm x 250mm) dish, the other up to 20 feet (6m) of 16mm film in a 10in x 8in (300mm x 250mm) dish. | |
|
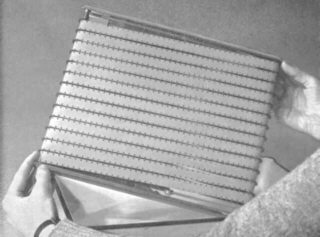
A spiral wire type of drum processing machine is shown below. It is was made from stainless steel or plastic materials. Three models were available. these were:P9 for up to 35feet of 9.5mm filmP16 for up to 26 feet of 16mm filmP35 for up to 12 feet of 35mm film.Normally hand tuned an electric motor, as shown, was also available. |
|
|
Using a Drum
Assuming that the darkroom arrangements are reasonably adequate, and that efficient safe lighting and access to clean (preferably running) water are provided, we can begin our routine as follows :
The above description of the various steps involved in processing a length of movie film is necessarily sketchy, and it cannot be over emphasised that all the preliminary work, such as making up the solutions, etc., should be carefully carried out and a simple system of operation adopted.
Test Strips
Before attempting to undertake the processing of a complete roll of exposed movie film, an initial test with a suitable test strip is strongly recommended. This test strip may be a short length broken from the beginning or end of the roll, or it may be exposed specially for the purpose, care being taken in so doing that the exposure given shall be generally similar to that received by the roll, or rolls, to be processed.
The test strip may be developed on the drum machine or, if preferred, in a dish or jug, or better still, a suitably stoppered length of glass tubing of bore to suit the film gauge. Whichever technique is used, it is important to match as closely as possible the actual conditions that the full roll will have to undergo on the machine. Thus, the make-up and temperature of solutions, the rate of agitation and so on - all these must be made to match the normal machine conditions. Obviously, it is safer to develop the test strip on the machine itself, but with a little experience the simpler expedient of dish or jug will be found to give quite satisfactory results.
Taking the test strip as your guide, it should be a relatively straightforward matter to decide on the time of development to give your full roll. If the issue is still in doubt, however, the test should be repeated with a development time more likely to give the desired result.
Providing that steps can be taken to control the second exposure adequately it is not impossible to ascertain, by means of test strips, the extent by which it should be varied from the normal in order to give some degree of compensation for serious over- or under-exposure. Obviously, in the simple technique with which we are concerned in this book, such compensation would inevitably apply to the whole reel being developed so that its usefulness would be restricted to cases where it is known beforehand that the reel is uniformly over or under-exposed.
Anti-Halo Backing
With some types of reversal film the anti-halo backing is located between the emulsion and the base, in which case it will be completely removed by the bleach bath. The Gevaert films are of this type.
With other types, notably Kodak reversal film, the anti-halo coating is on the back of the film, and contact with the drum surface may make complete removal a little more difficult. The best way to overcome the difficulty is to wipe the back of the film while still on the drum with a small pad of cotton wool, immediately after hardening or during the bleaching operation. To do this without damaging the film, simply insert the pad of cotton wool under the free end of the film and hold it in c~ne hand while slowly turning the drum with the other.
Handling Positive Film
Processing positive film presents less of a problem than negative film since it is perfectly safe to handle it in the normal orange light used with bromide enlarging papers. The steps to be followed are the same as those described for negative film, i.e. up to step 6, with the obvious exception that a positive type developer should be used at step 5. Since there is no form of anti-halo coating on positive film, no special action is called for in this respect.
Some Common Troubles
Until you gain experience in processing your own films, it is more than likely that you will experience one or more of the troubles listed below. Should you do so, make a point of seeking out the cause of the fault at once. You will thus greatly reduce the risk of it happening again.
Picture too light. First development too long, or second development too short.
Developer old or exhausted.
Insufficient second exposure (in reversal).
Picture too dark. First development too short, or second development too long.
Developer at fault.
Over development in second developer.
Yellow stain. Bleaching incomplete or clearing bath at fault.
Blisters or reticulation. Solutions used at too high a temperature, or too great a difference in temperature between the various baths and the wash water.
Bleaching too slow. Bath exhausted or acid content too low.
Streaky picture. Rate of drum rotation too slow.
Drying spots. If a wetting agent has not been used these are usually due to droplets of water left to dry on the film by insufficient squeegeeing. They may also be due to oil on the film.
Buckling of the film. If the film is unduly strained during processing, it may dry in a buckled condition and so give rise to trouble in projection. Check that the tension on the drum is not too great, especially during the drying period when the film will tend to shrink. Buckling may also be due to too rapid drying by excessive heat.
Negative density wrong. On negative film, too thin a picture may be due to under, or faulty, development (or underexposure in the camera.) Too heavy a picture may be due to over development (or over-exposure in the camera).
![]()
![]()